
Celeriac: The Other Root Vegetable

Baked Spiced Celeriac and Yam Fries
Photo by David Bishop

Celeriac Roots
Photo by David Bishop
Celeriac, or celery root, is a kind of celery in the parsley family. It is cultivated for its flavorful and nutritious qualities, and can be used as a substitute for white potatoes, though it stands well on its own. Celeriac has less than half the calories of mature white potatoes and delicious. The stems and leaves look very similar to the common celery which is often eaten raw, used in salads and in recipes. Celeriac leaves can also be used in the same ways but more but with caution, since their flavor is much stronger. I like to use the leaves for garnish, either chopped or whole, and often mixed with chives or scallions.
Celeriac differs from most root vegetables in that it is not very starchy.It is low in carbs and calories, low in saturated fat and cholesterol, and is known to lower blood cholesterol, lessen the risk of stroke, heart attack and obesity, and reduce irritable bowel syndrome. It is high in Vitamin C, Vitamin K, Phosphorus, Potassium, Dietary Fiber, Vitamin B6, Magnesium and Manganese. All of these qualities can greatly contribute to all over health and weight loss.
I have included four recipes and modes of preparing celeriac here for your pleasure and health, with the added benefit of beauty and style for entertainment.
Recipe for Baked Spiced Celeriac & Yam Fries Serves 4
Ingredients
1 medium celeriac root
1 medium yam – orange color for contrast
2 Tablespoons freshly squeezed lemon juice
¼ cup extra virgin olive oil
Turmeric to taste
Paprika to taste
Course sea salt to taste
Directions
Preheat oven to 375”F
Peel the yam with a vegetable peeler
Peel the celeriac bulb with a paring knife
Cut both root vegetables into large juliennes, about 3” X 1/2”
In a bowl, toss the celeriac juliennes with the lemon juice
Boil the celeriac juliennes for about 20 minutes and drain well
Boil the yams for a bout 15 minutes and drain well
Dry both root juliennes well and toss with just enough olive oil to coat the fries
Line 2 sheet pans with parchment paper
Lay the celeriac onto one pan, single file and the yams onto the other
Sprinkle the celeriac strips with turmeric and the yams with paprika, turning to cover all sides lightly.
Sprinkle all of the juliennes lightly with flaked sea salt on all sides
Bake in a the oven for 20 minutes, turning the fries over about 1/2 way through to brown all sides
Serve immediately

Herbed Celeriac Chips
Photo by David Bishop
Celeriac chips as a substitute for potato chips is a very smart choice in so many ways. First there is the calorie count. Raw, celeriac has 66 calories per cup while white potatoes have 142 calories per cup. Celeriac is high in both soluble and insoluble fiber, which is essential for not just colon health, but the all over health of the body, including diabetes reduction, lessening the threat of heart attach, stroke, obesity and irritable bowel syndrome. See http://www.webmd.com/diet/fiber-health-benefits-11/insoluble-soluble-fiber Dietary Fiber: Insoluble vs. Soluble
Recipe for Herbed Celeriac Chips Snacks for 2
Ingredients
2 quarts canola oil
2 small celeriac bulbs, peeled
¼ cup freshly minced flat parsley
Sprinkle grated Romano cheese to taste
Flaked sea salt to taste
Directions
Heat the canola oil in a fryer or a deep pot to 375”F.
Keep track of the temperature with a good insertion thermometer. If you are using a pot on your stove, keep a lid nearby in case a spill causes a fire in the oil. Putting a lid on the pot immediately will extinguish a flame.
Cut the peeled celeriac root in half to make it easier to shave
Shave the celeriac root with a vegetable peeler, or cut it very thinly with a really sharp knife
Fry the slices until they are golden brown on the edges, in small batches. Do not crowd the fryer
Drain the crisps on paper towel lined baking sheets
Sprinkle immediately with flaked sea salt
Sprinkle with minced parsley and grated Romano cheese if desired

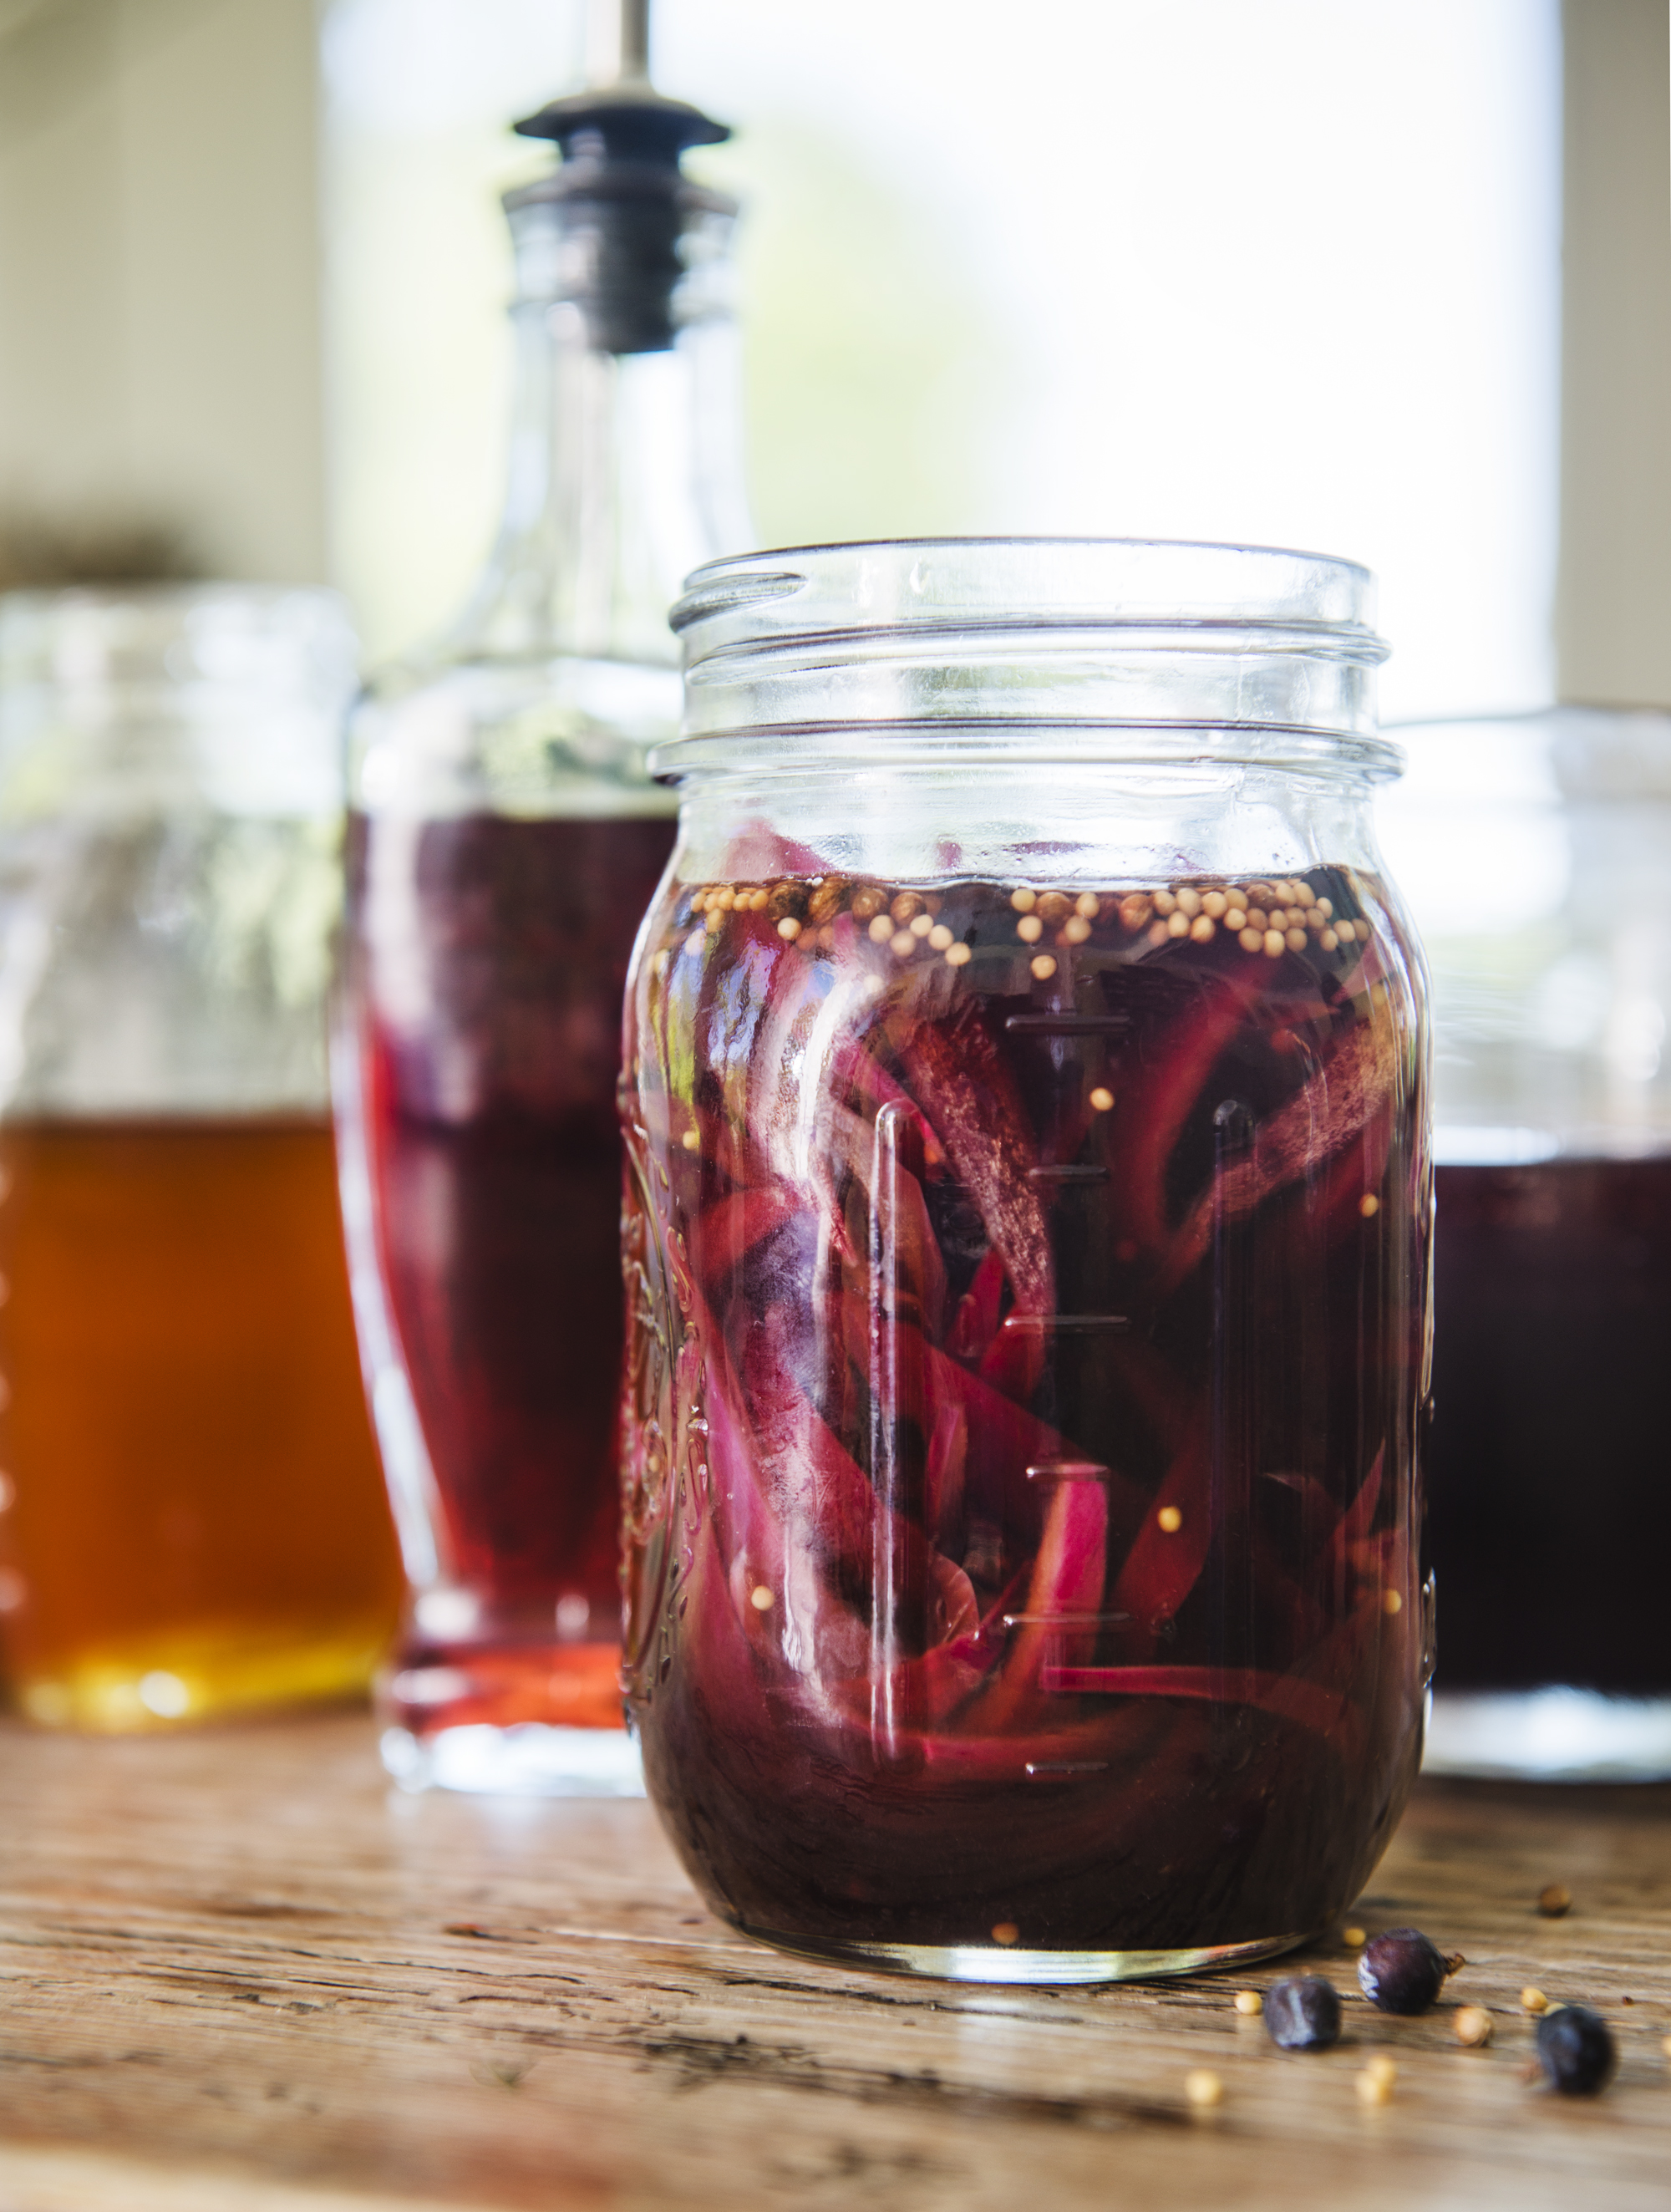
Celeriac and Pear Soup with Pickled Red Onions
Photo by David Bishop
This Recipe for Celeriac and Pear Soup is delicious served hot, cold, or at room temperature, making it a truly versatile starter, snack or lunch. The pickled red onion adds a sweet, tart, salty zazz that punches the flavor level up to excellence, balancing and harmonizing with the celeriac, pears and shallots.
Recipes for Celeriac & Pear Soup with Pickled Red Onions Serves 2-4
Ingredients for Pickled Red Onions
1 small red onion, peeled and sliced very thinly
1 cup white grape juice
½ cup of red wine vinegar
¼ cup honey
½ teaspoon sea salt
¼ teaspoon mustard seeds
¼ teaspoon coriander seeds
¼ teaspoon celery seeds
Directions for Pickled Red Onions
Combine all ingredients in a quart size sauce pan
Boil for about five minutes
Remove the onions with a slotted spoon to a plate to allow to cool, laying them out as separately as possible
Ingredients for Celeriac & Pear Soup
1 quart of free-range chicken broth
2 medium celeriac bulbs, peeled and diced into one inch cubes
2 ripe pears diced into one-inch cubes (I used the Bartlett variety for their sweetness and golden blushed pink skin)
2 shallots, peeled and sliced thinly
¼ teaspoon freshly ground black pepper
¼ teaspoon ground nutmeg
Directions for Celeriac & Pear Soup
Boil the celeriac and seasonings in the chicken broth for about 15 minutes or until just tender to a fork and bite
Add in the pears and continue to lightly boil for another 5 minutes.
With a slotted spoon, remove about a cup of the solid pieces in the soup to a small bowl and reserve
Puree the remaining soup in a blender or with a stick hand blender
Add back into the soup, the reserved solid pieces and stir to incorporate
Serve into shallow soup bowls and garnish with Pickled Red Onions and chives
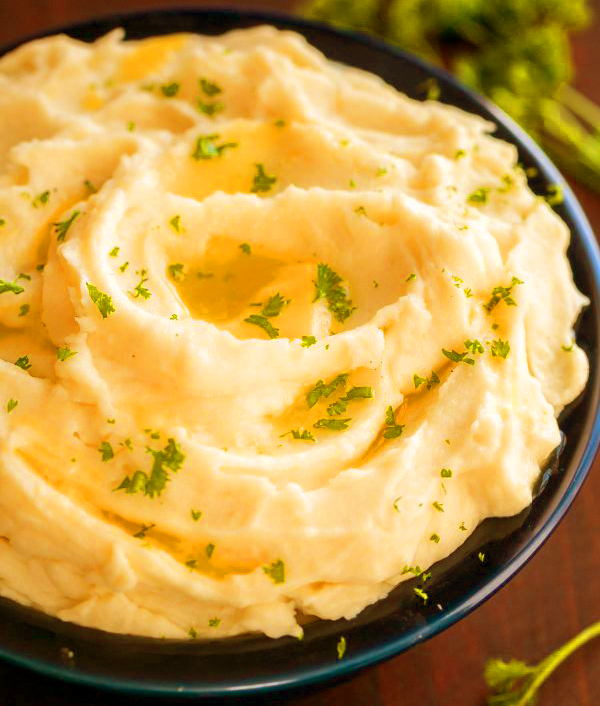
Mashed Celeriac and Carrots
Mashed Celeriac and Carrots Serves 4-6
Ingredients
2 quarts salted boiling water
4 medium bulbs of celeriac diced into one inch cubes
2 large carrots, chopped into one inch pieces
1 medium onion medium coarsely chopped
1 chopped shallot
1 tablespoon of extra virgin olive oil plus additional for garnish
¼ teaspoon turmeric
¼ teaspoon cayenne pepper
Sea Salt to taste
Directions
Boil all the ingredients until they are soft enough to mash.
Drain the cooked vegetables, reserving the liquid.
Mash the vegetables in a bowl with a hand masher or fork, adding back in the liquid as needed for your desired consistency.
Arrange the mash gracefully in a serving bowl. Drizzle with additional olive oil.
For more eye appeal, garnish with chopped scallions, sea salt flakes and dash of pepper.
Tip: Celeriac is also wonderful grated raw into salads. Have fun creating your own recipe renditions with this intriguing, delicious and healthful vegetable.

A Jubilant July Picnic at Coastal Maine’s Mead Meadow
Part 3: Portobello Cheese Burgers and Grilled Vegetables

Photos by Michael Marquand
Recipes by Marilinda Hodgdon
Welcome to Part 3 of our Southern Maine picnic, inspired by the glorious fresh bounty of summer by the sea. In the last post I expounded the virtues of two delectable seafood appetizers to go with Part 1’s sparkling sangrias; Fresh oysters on the half shell with chive, cucumber and pink peppercorn mignonette, plus crostini of lobster and pea purèe with Amontillado Hollandaise sauce. In this post I present my vegetarian main course of Grilled Portobello Cheeseburgers with Baby Arugula, Avocado Herb Mash and Pickled Red Onions accompanied by Grilled Asparagus, Leeks and Fennel with Moroccan Spiced Corn on the Cob.
The star of our main event, Portobello Burgers, are all dressed up with everywhere to go! Their giddy grilled vege entourage is ready for a party night. Let’s go behind the scenes for an up-close and personal look at the making of the tantalizingly tasty oh-so-umami burgers. The magic is in the marinade!

First we must gather the Burger Build Components, some of which we can make ourselves. The recipes make 12 servings, but you can adjust the numbers for your own party needs.
· Portobello Mushrooms Caps-3-4 inch diameter by 1-2 inch high
· English Muffins
· Plu gras butter – softened at room temperature
· Baby Arugula Lettuce
· Havarti Cheese Slices
· Pickled Red Onions
· Avocado Herb Mash
You will want to make the Pickled Red Onions first, to give them time to rest and cool before they are called for their close-ups.
Pickled Red Onions
Ingredients
· 2 Small red onions, sliced into thin crescents
· 1 Cup of pomegranate juice
· ½ Cup of red wine vinegar
· ¼ Cup of honey
· ½ Teaspoon yellow mustard seeds
· ½ Teaspoon coriander seeds
· ¼ Teaspoon sea salt
· 4 Juniper berries
Directions
1. Bring the liquids and spices to a boil
2. Lower the heat to a simmer and add the onions
3. Cook for 5 minutes or less until just tender
Let cool - The onions will continue to soften while the mix cools
Next, prepare the mushroom caps for their marinade soak and subsequent grilling. You can use a charcoal or wood grill, gas grill or frying pan. Whatever is best for you, or easiest, will work. A wood fire adds a nice earthy smoky flavor component, but these babies are bursting with so much flavor that you will be thrilled either way you do it.

Photo by Angela Olsen Mathews
Magic Marinade
Ingredients
· 1 Cup olive oil
· ¼ Cup Balsamic vinegar
· 1 Tablespoon toasted sesame oil
· ½ Teaspoon sea salt, or to taste
· ½ Teaspoon freshly ground black pepper, or to taste
Directions
1. Whisk all of the ingredients together
Portobello Mushroom Caps
Ingredients
· 12 semi open Portobello Caps that slightly overhang the English muffins
Tip: If the mushrooms are completely opened they will be very flat with a less appealing finished look on the burger sandwich. Use the leftover mushroom stems in your morning omelet.
Directions
1. Clean the dirt from the mushroom caps being careful to avoid getting the gills wet.
2. Brush both sides of Portobello mushroom caps with marinade.
3. Let them rest for 15 minutes.
4. Prepare the rest of the components before you cook the mushroom caps.
5. Grill the rounded side on medium heat until tender, 3 minutes.
6. Flip the cap to the gill side and add a slice of Havarti cheese slice to the round side.
7. Cook for another minute or less. Do not let the cheese get too melted. It will continue melting after it is off the heat.
8. Place the cheese-covered caps onto a plate and place in your building station.
The next step is to prepare the Avocado Herb Mash.

Avocado Herb Mash
Ingredients
· 1 Ripe avocado
· ½ Lemon for juicing
· 2 Tablespoons of chopped chives
· 2 Tablespoons of minced fresh Italian parsley
· ½ Teaspoon freshly ground white pepper
· Pinch of sea salt to taste
Directions
1. Mash the avocado with the lemon juice, leaving at bit of chunky texture.
2. Add the herbs and spices into mashed avocado and mix well.
Wash and dry the baby arugula and prepare the English Muffins to get ready for your build.
English Muffins
· 12 English muffins
· 2 Sticks or ½ pound softened (room temperature) European Style Plu Gras Butter
Tip: I sometimes use 1:1 unsalted:salted, depending on how salty you make the rest of your ingredients.
Grill the mushroom caps.

Burger Build
1. Split the English muffins and toast both halves.
2. Spread the bottom muffin half with softened unsalted plugras butter.
3. Add a small handful of baby arugula onto the butter on the muffin bottom.
4. Spread the Avocado Herb Mash on the top muffin half
5. Place the cheese topped mushroom on the arugula
6. Top the cheese with about a tablespoon of pickled onions
7. Add the top muffin half to finish the burger build

To accompany our Portobello Burger star is the beautiful and delicious medley choir of Grilled Vegetables and Moroccan Spiced Corn on the Cob.

The first step in preparing the vegetables is to ready them for the grill. The is corn is cooked with the husk on to impart the flavor of the char-roasting husks into the fresh and delicate kernels of sweet just picked corn, without scorching or drying them out. This is done by carefully pulling back each leaf, leaving them attached to the cob. Once accomplished, remove the silk. Delicately smooth the husk leaves back to their original positions on the cob. Soaking the cobs in water, restored of their husks, will prevent too much burning, allowing the sweet kernels to steam to perfect tender juiciness.
The leeks are split in half or quarts lengthwise, depending on their girth, to allow washing of their sandy interiors. The fennel bulbs, stems and fronds are also sliced lengthwise into halves, quarters or eighths, depending on their bulb circumference, for even cooking. The asparagus are trimmed of the woody ends of their stalks for even cooking and tender eating. If they are very large asparagus, they will need an additional pairing, with a vegetable peeler, of the thickest part of the ends.

The preserved half lemons are grilled with their cut faces down. Most directions for preserved lemons call for them to be cut lengthwise in quarters and require a month to be ready. I preserve mine for 2-3 weeks cut into halves for this presentation and better grilling. You can find many recipes for preserved lemons online, or buy them in jars at gourmet specialty shops or Middle Eastern stores. Recipes often say to use just the rinds, but I often use the whole fruit in my recipes. They are very easy to make. If you can’t find Meyers lemons, just use what you can find. Myers lemons are sweeter and less acidic. In this recipe it does not matter.

Grilled Vegetables
Ingredients
· Large Asparagus
· Leeks split into halves lengthwise
· Fennel Stalks split into quarters or eighths lengthwise
· Corn on the Cob with husks attached
· Preserved Lemon Halves
· Olive Oil enough to lightly coat the asparagus, leeks and fennel
· Sea salt to taste
Directions
1. Lightly brush asparagus, leeks and fennel with slightly seasoned olive oil to prevent sticking to the grill.
2. Add a sprinkle of Marash pepper flakes for extra color and flavor
3. Carefully pull back the husks of the corncobs, leaving them attached.
4. Remove the silks from the corn
5. Replace the cornhusks onto the corncobs, one by one to cover the kernels well
6. Soak the corncobs so that they resist burning on the grill
7. With a watchful eye, on medium high heat, grill the vegetables and corn, turning as needed until they reach the desired doneness, each vegetable will take a different timing. The fennel will take the longest. The corn takes less time than you think. Do not over cook the delicate asparagus!
8. Grill the preserved lemons with their cut sides down until grill marks are distinctive.
When the corn is finished roasting, remove the husks to ready them for their adornment of amazingly delectable Marash Pepper Herbed Goat Cheese & Greek Yogurt Sauce.


Marash Pepper Herbed Goat Cheese & Greek Yogurt Sauce for Grilled Corn
Ingredients
· 8 Ounces Plain Whole Milk Greek Yogurt
· 4 Ounces Soft Mild Spreadable Goat Cheese
· 2 Tablespoons Extra Virgin Olive Oil
· 2 Tablespoons minced Chives
· 2 Tablespoons minced Italian Parsley
· 1 Tablespoon minced Fresh Mint Leaves
· 1 Tablespoon minced Preserved Lemon Rind
· 1 Tablespoon preserved Lemon Juice/Pulp
· 1 - 1½ Teaspoons Marash Pepper or Crushed Red Pepper Flakes
· 1 Teaspoon ground Coriander
· Crumbled Feta for Garnish - Feta is used here to replace Jben, the commonly used Moroccan Cheese.
Directions
1. Mix everything except the Feta together thoroughly.
2. Pull the and discard the husks from the grilled corn cobs.
3. Roll the corncobs in the spiced sauce to coat each thoroughly.
4. Crumble Feta to garnish the sauced grilled corncobs.
My next post, Part 4 of the Picnic at Coastal Maine’s Mead Meadow is the finale to the feast. It will feature my homemade Maine blueberry cheesecake ice cream popsicles with a do-it-yourself dark chocolate magic shell coating. A perfect finish to a sumptuous summer supper al fresco!

Mead Meadow Main House and Patio
A special heartfelt thanks to Angela Olsen Matthews and her husband, Peter Matthews, at Mead Meadow for their thoughtful and gracious generosity and hard work in hosting our scrumptious and serene summer picnic. You can visit Angela’s Instagram page @MeadMeadow
About Mead Meadow
We were invited to historic Mead Meadow, in picturesque Kittery Maine, to shoot our delightful summer outdoor meal. This water front paradise is a restored 140 year old farmstead, originally a 20 acre estate, was called Mead Summer House. Included: the main house, a horse and buggy carriage house, which is now a guest cottage, a boat house and the original well. The lovingly restored buildings are now nestled on 4 acres of manicured grass surrounded by wild and cultivated flowers, raspberry bush stands, shrubbery and original trees. The garden shed was torn down and its beautifully weathered old New England stones have been transformed into a spacious patio surrounded by potted herbs and flourishing flowers, with a bucolic view of the rear grounds and cove.
A Jubilant July Picnic at Coastal Maine’s Mead Meadow
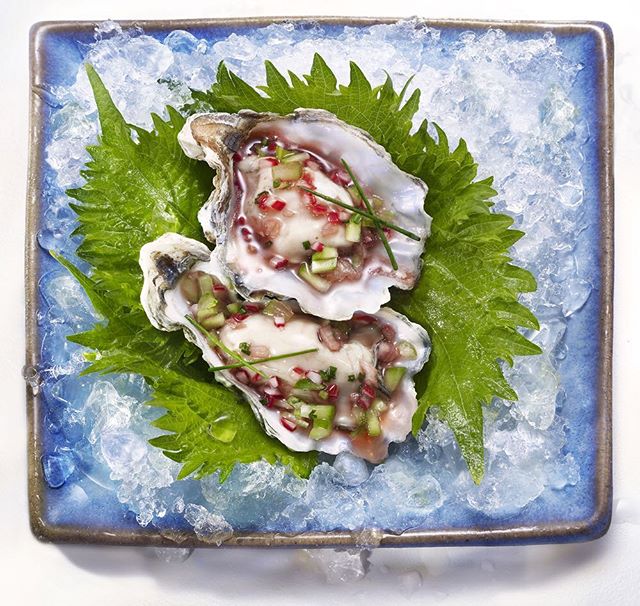
Part 2: Seafood Appetizers
Photos by Michael Marquand
Recipes by Marilinda Hodgdon
Welcome to Part 2 of our Southern Maine picnic, inspired by the glorious fresh bounty of July by the sea. In the last post I presented the Red, White and Blue Sparkling Prosecco and Lambrusco Sangrias to sip with our seafood appetizers. In this post I present the appetizers: my versions of oysters on the half shell with mignonette sauce and lobster claw and pea puree crostini.
The fresh oysters on the half shell are adorned with a colorful mignonette sauce, made of freshly snipped chives from Mead Meadow’s herb garden, minced mini cucumbers, crushed pink peppercorns and Moscatel wine vinegar.

The sourdough crostini slices are loaded with a pureè of shallot and fresh English peas. The freshly caught local lobster claws nestle into the pea pureè . The claws are draped with lemony Amontillado Hollandaise sauce and are garnished with fresh pea tendrils. The local seafood vender graciously sold us just the claws we wanted by simply putting our order in a couple of days ahead. Some shops carry fresh containers of just claws, since they also sell just the tails. Because we ordered ahead of time, we were able to ask them to be careful to keep the claws as intact as possible for our aesthetic purposes. Some were a little ripped or separated, but I made due by covering those spots with the sauce. Angela of Mead Meadow grew the peas herself, on my request, to make sure we would have the pods and tendrils for our shoot. In spring and early summer they are plentiful in most markets these days.

Recipes
Maine Oysters on the Half Shell with Mignonette of Chives, Minced Cucumbers and Crushed Pink Peppercorns
Ingredients
· 24 small Maine Oysters
· 1 Lb. Coarse Sea Salt for presentation
Mignonette Sauce
· 1 cup of Moscatel or Sherry Wine Vinegar
· Small Bunch of Chives
· 1 Tablespoon of Pink Peppercorns
· One small Persian Cucumber
· 3 Medium Lemons to Make 24 Lemon Wedges
Directions
1. Sort oysters to discard any dead.
2. Wash oysters of any sand.
3. Finely chop Chives.
4. Finely mince Persian cucumbers, keeping the skin
5. Crush the Pink Peppercorns
6. Mix the Chives, Cucumbers and Crushed Pink Peppercorns with the Vinegar
7. Open Oysters, reserving all liquid.
8. Lay oysters on a bed of course salt and add the oyster liquid to the oysters.
9. Spoon a small amount of the Mignonette sauce onto each oyster shell
Serve immediately while cold with sparkling sangrias.
Lobster Claw Crostini with Fresh Pea Pureè and Lemony Hollandaise Sauce
Freshly Purchased
· 20 Small Fresh Maine Lobster Claws
· 1-2 Sourdough Baguettes Sliced into ½ inch Diagonals
Pea Puree
Ingredients
1 Pound of Fresh English Peas
1 Quart of Water, Vegetable or Seafood Broth, or a mix of your choice
2 Medium Shallots
¼ cup of Amontillado Sherry
1 Tablespoon Sea Salt
½ Teaspoon Ground White Pepper
Directions
Thinly slice the shallots.
Sort the peas for any withered items.
Wash the peas.
In a medium large pot, bring the water and salt to a boil.
Add the shallots and peas.
When the peas are tender and still bright green, remove them & shallots to cold water to stop the cooking and preserve the color. Reserve a cup of the cooking liquid in a measuring cup.
With a slotted spoon or spider add the cooled peas back into the cooled empty pot with the sherry and pepper.
With an immersion blender pureè the peas, shallots and sherry, adding in cooking liquid as needed, until smooth.
Season with additional sea salt & white pepper to taste, being very careful to allow for salt in the lobster and hollandaise.
Marilinda’s Hollandaise Sauce
Ingredients
4 free range organic egg yolks
½ cup or more of plu gras (European Style) unsalted butter
½ freshly squeezed lemon juice, or more to taste
1 Tbs. Amontillado Sherry
1/8 tsp of ground cayenne pepper
Pinch of sea salt to taste
Directions
Beat egg yolks, lemon juice, cayenne pepper and salt together.
Melt butter in a small pan over very low heat.
Slowly whisk the butter into the egg yolk mixture until it is all incorporated.
Keep whisking constantly until the egg yolks thicken the sauce to the desired consistency.
Briskly whisk in warm sherry to flavor the sauce.
Use the warm sauce immediately.
Tip: To thin and reheat congealed sauce, whisk in a tiny bit of warm water. Garnish with fresh pea shoots and tendrils.
To Assemble Crostini
Slice the baguettes.
Spread each slice with about 1-2 tablespoons of pea puree, depending on their size.
Add one claw to each pureè topped slice.
Spoon hollandaise over each of the claws
Garnish with peas shoots and/or tendrils.
Stay tuned for my next post, Part 3 of our Picnic at Coastal Maine’s Mead Meadow. It will feature the main course of cheesy portobello burgers crowned by pickled red onions, avocado mash and baby arugula. The grilled vegetable sides are asparagus, fennel and leeks, accompanied by Moroccan spiced, grilled in their husks, corn on the cob.
Part 4, the finale to the feast, is homemade Maine blueberry cheesecake ice cream popsicles with a do-it-yourself dark chocolate magic shell coating.

Mead Meadow Boat House
A special heartfelt thanks to Angela Olsen Matthews and her husband, Peter Matthews, at Mead Meadow for their thoughtful and gracious generosity and hard work in hosting our scrumptious and serene summer picnic. You can visit Angela’s Instagram page @MeadMeadow
About Mead Meadow
We were invited to historic Mead Meadow, in picturesque Kittery Maine, to shoot our delightful summer outdoor meal. This water front paradise is a restored 140 year old farmstead, originally a 20 acre estate, was called Mead Summer House. Included: the main house, a horse and buggy carriage house, which is now a guest cottage, a boat house and the original well. The lovingly restored buildings are now nestled on 4 acres of manicured grass surrounded by wild and cultivated flowers, raspberry bush stands

Paella Pizzazz
The first time I had a really great paella was in Majorca Spain, where every kind of seafood available could be obtained freshly caught, having never been frozen. The flavor and texture is incomparable to our once frozen varieties. The shrimp and baby squid quite literally melted in my mouth.

Photo by David Bishop
The first time I had a really great paella was in Majorca Spain, where every kind of seafood available could be obtained freshly caught, having never been frozen. The flavor and texture is incomparable to our once frozen varieties. The shrimp and baby squid quite literally melted in my mouth. My Uncle Nick had an apartment there in town over looking the marina. Two friends of mine and I were visiting with him for the Christmas and New Year’s holidays. He prepared the most incredible paella, taking no short cuts, making his stock from scratch.
In my version, seen above, I did my best to recreate the flavors and textures I remembered from Spain. I did take a tiny short cut in buying organic free range chicken stock and clam juice, which I enhanced by boiling it down with chicken wings, a lobster head, shrimp shells, a whole carrot, onion and celery stalk, a couple of bay leaves, a few sprigs of thyme, and a pinch of saffron.

Photo by David Bishop
While researching paella to write and shoot this recipe, my photographer friend, David, and I went to a Spanish Restaurant in NYC, El Charro Español, which specializes in paella. I wanted some tips to help me come up with my recipe. I ordered the seafood paella and David ordered the Paella Valenciana, which also included seafood and featured chicken and chorizo, a smoky, spicy sausage. I usually don’t eat pork products due to the high Triglyceride levels, but when I tasted what a difference it made in the flavor of David’s rice compared to mine, I was sold on chorizo in paella as a must. Luis, the owner of the restaurant, generously lent us a paella pan. I am told that the pan can make all the difference, but that the most important thing is the proportion of the broth to the rice, and of course the flavor of the broth.
Paella Valenciana
Pre-heat the oven to 450ºF and place a shelf close to the bottom of the oven
Meat and Seafood Ingredients
- 1 small live lobster (Remove the head and small legs for the stock; Cut the tail into 1 inch pieces, leaving the shell on, for use in the paella pan.)
- 4 chicken wings, browned on both sides in plenty of olive (Use 2 wings for the stock.)
- 12 tiny clams, scrubbed and sorted to ensure that they are alive (I prefer Cockles. They are ridged and have a green tint.)
- 1/2 pound medium shrimp (Remove the shells and heads for making the stock)
- 1/4 pound small mussels, scrubbed and sorted
- 1/4 pound sea scallops, cut into quarters
- 1 8 inch chorizo sausage, sautéed in the same pan with the chicken, then cut into 3/4″-inch thick rounds.
Prepare the seafood. Refrigerate until you are ready to put them into the paella pan along with the cooked chicken and chorizo.
Broth:
- 1 quart of organic free-range chicken stock
- 1 pint of clam juice
- 1 cup of dry white wine
- 1 8 ounce can of crushed San Marzano tomatoes
- 2 chicken wings, browned on both sides
- 1 lobster head
- shrimp shells and heads
- 1 large onion, washed and quartered, no need to peel the flavorful skin
- 1 whole carrot, scrubbed
- 1 celery stalk, scrubbed
- 3 bay leaves
- 3 sprigs of thyme
- 1 teaspoon crushed saffron fibers
Boil the broth ingredients until it reduces to about half of the volume, or until you need to use it. Strain out the bits and discard them.
Vegetable & Rice ingredients:
- 1/2 cup chopped onion
- 1/2 cup chopped, roasted Piquillo peppers or Italian roasted red peppers
- 1 minced shallot
- 1 teaspoon hot, smoked Hungarian Paprika
- 1 teaspoon crushed Saffron threads
- 1 teaspoon sea salt
In a paella pan, sauté the above ingredients in olive oil over medium heat until the onions and shallots are soft and translucent. Then add in:
- 1 cup short grain rice such as Arborio or Bomba
- 1/2 cup cherry or grape tomatoes, cut into halves
- 1/2 cup of canned butter beans, drained
- 1/2 cup blanched haricot vert, cut into one inch lengths
Stir together thoroughy, then add in:
- 2- 2 1/2 cups of hot broth
Continue cooking the rice blend for about 5 minutes, stirring all the while. As the rice gets a bit thicker, start adding in the proteins from the largest to the smallest, nestling them into the rice mixture. Place the paella pan on the bottom shelf of the oven. Bake for about 20-30 minutes until most of the broth is absorbed, and the rice is just bit al dente. Cover and let rest for about 10- 30 minutes before serving. Having a crusty bottom is considered a good thing. It adds flavor and depth to the dish.
Serve with lemon wedges and white or red sangria.
Secrets of a Food Stylist
The Art of Making Beautiful Food


INSTAGRAM
@MarilindaFoodStylist


@TWITTER
@MarilindasFood
COMMERCIALS: